This will answer some commonly asked questions and will guide you step-by-step on how to use the track option on our Bluzone cloud platform.
...
- Load and calibrate location map (about a 300k size PNG is recommended) into Bluzone.io cloud. Cloud will plot proper map coordinates
- Create WiFi template on Bluzon.io to enable BluFi connectivity once provisioned to proper WiFi AP
- Install physical BluFis at location and provision them using Bluvision Bluzone app. The app will log the location where the BluFi is being installed, and load proper WiFi settings and configuration via BLE from phone to BluFi over a secure RSA/SSl link
- Once all BluFis are installed, check the cloud to make sure all of them are online and working properlyProvision master beacon using Bluzone app, and configure master beacon with appropiat firmware settings
- Launch calibration app, and start walking with calibration designated beacon. Add calibration points as indicated on app/map
- RTLS is now working in your zone
- Start adding geofences and other policies to location/account
Before you start RTLS configuration
Ensure that your account has the right permissions enabled for RTLS asset tracking. You can check by going into any BluFi and see if it has Asset Tracking Settings in General tab
Confirm 3Mb/s upload min on 2.4GHz WiFi available throughout area where BluFis will be deployed
Verify that your Blufi is setup for:
asset tracking by checking the "Asset Tracking" checkbox for the Blufi in the Bluzone portal (BluFis > General > Asset Tracking Settings).
using the right scan mode by checking the "Scan mode" section on the same page and checking "Multi-Channel".
Verify that your Blufi is properly connected to Bluzone.
Verify that your beacon is setup for asset tracking by checking the "Asset Tracking" checkbox for the beacon in the Bluzone portal (Beacons > General > Asset Tracking Settings). Verify Asset Material Type is correctApply the proper beacon configuration for asset tracking calibration by applying the appropriate configuration template (Beacons > Configuration > Apply Template > Select "Default iBeek Template - Asset Tracking Calibration" for iBeeks / Select "Default Beacon Card Template - Asset Tracking Calibration" for Beacon Cards > Update). Alternatively, can provision via the bluzone app found in the Apple store and choosing the appropriate template.
Applying a template will require Bluzone to perform a configuration job on the beacon. Blufi needs to be properly connected and beacon needs to be within its range. (track job status on Bluzone portal via - Beacons > Jobs).
Once all configuration is completed, you can proceed with your calibration.
- Once all BluFis are set, take a SS of the fleet screen in order to remember the position of the BluFis. It is extremely important that BluFis are not moved once calibration process is started; either physical location or location on map
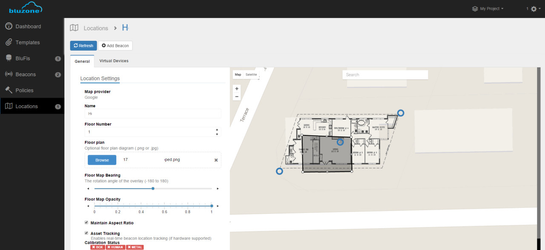
- Ensure that appropriate information (a clear floor plan, floor number and boundary) of the area that you would like to configure for RTLS is uploaded on Bluzone.io portal. Detailed instructions are available at 02. How-to Setup Locations. An example of RTLS location is provided below for your reference
- FYI. Color coding for Calibrator App:
- Human - Purple/eggplant
- Metal - Gray/Silver
- Box - Brown
- BluFis - Magenta
- Current Location - Red
...
How-to configure multiple beacons for RTLS
...
How-to track beacons in Bluzone.io portal
After you are done with calibration points, you can log Log into your account and start tracking beacons
- Log into the account
- Go to Beacons tab and select the beacon you would like to track
- After you select the beacon, click the button named "Track"
- The tracking map will open and will start tracking automatically
- You can turn on/off following settings as preferred:
- Trace the path - Shows the path that the beacon moved while tracking
- Auto-center
- Show BluFis - Shows the provisioned BluFi for the location
- Show metadata - Show lat/long, variance and a timestamp for the tracking
- You can turn on/off following settings as preferred:
...
Related articles
| Filter by label (Content by label) | ||||||||||||||||||
|---|---|---|---|---|---|---|---|---|---|---|---|---|---|---|---|---|---|---|
|
...